Eivind Fivelsdal - Oslo - Norway
Music Gear OldGear Discography eMail About OldPictures Roland System 100 Moog Taurus Links Synth DIY-Links
The Shoplifter PAiA Theremax Theremin MIDIMINAFY Studio Electronics ATC-1
Template for controlling the Studio Electronics ATC-1 with Behringer BCR-2000
Building an organ console - DIY project
After many years of playing piano and various keyboard instruments I dediced I wanted to start practing playing the pipe organ.Or to be more precice, a virtual pipeorgan. Like many others I'm by no way an experienced wood worker. I do know a thing or two about electronics, but carpentry on this level was totally new to me. My lack of experience has been compensated by working ever so slowly.
Computers are now more than powerful enough to recreate the king of instruments with a very realistic result. The industry standard software is called Hauptwerk. If you're a musician, at least do yourself the favour of trying out the free version of the software. You will be amazed.
The fist big question - do I build the pedal board myself? Vidar Fagerjord did it, and have also made a very instructive web-page about his project. However - after some browsing on eBay - I decided to buy an old used pedal board that already had MIDI installed. I got a decent deal on a nice walnut pedal board at Encore Organ Technology.
I made these web-pages for my own references. How does it sound? It doesn't. This is only a large controller for MIDI-data. Sound is created via sample based software in a computer and an external sound system. At page 2 there is a link to me playing a small piece as well as further plans for my music room.


THE PLAN
1. First I will build a four manual keyboard console with thumb pistons and a rough bench. When they're finished I will be able start parcticing and playing the thing.
The console is with few exceptions made according to the AGO-standard (American Guild of Organists).
2. Build a module containing 3 pedals for crescendo and swell, and also add 10 toe pistons.
3. Build a larger console to hold a multichannel speaker system and two touch screens for the HW software.
4. Build a proper organ bench.
IMPORTANT NOTICE: I do not recommend the solution I chose for making the keyboard console. It works, but there are better and easier ways to make this kind of console. It's simply too much work involved if you have to dissasemble the unit for maintenance.
Shipping the somewhat large thing from Minnesota to Norway took me some time to figure out.
But eventually it did arrive.

THE WORKSHOP
The slabs of oak by the band saw will eventually become key cheeks for the console.

KEYBOARDS AND ELECTRONICS
I ordered 4 x Fatar 61TP/6LP keybeds from Pausch-e in Germany. They're not the very best of organ keyboards, but they're built for emulating the tracker touch of pipe organs. The key surface is very nice and playable.
Normally one would make wooden frames for each manual, but notice the steel brackets. Along with the key cheeks they will make up a sturdy frame. I got the idea for this construction from a friend: Etcetera.
From Pausch-e I also ordered 4 x Doepfer MKE's for the keyboards. They also have provisions for volume/swell-pedals. And one of Pausch-e's own products a MIDI-scan for controlling thumb- and toe pistons.

The Fatar card board boxes does not protect the keyboards very well.
One of them got damaged during transport, but Pausch-e sent me new ones promptly. Replacing the broken keys was pretty easy.

BOTTOM PLATE
For the bottom plate I used a cheap wooden bench table. The lowest manual will be mounted with screws directly into it.
Trying it out with the keyboards I noticed that the black keys touched the plate when played hard. To remedy this I made a cavity with the plunge router.

Looking at the plate from the bottom.
I stained, oiled and waxed it to make it durable, and to make it blend in nicely with the oak wood.


Routing cavities into the key cheeks.
The steel brackets of the Fatar keybeds will be mounted there.


Key cheeks routed. They are now ready for holes to be drilled for the bolts that will hold the manuals together.
When all cavities are made, it's time for rounding the corners.

In order to measure up for the piston rails I had to make a few temporary assemblies.
Trying out the first two lower manuals here.
How will this thing look?

With all the keyboards stacked, I could make the final measurements.
Also beginning to realise that I will need some assitance to carry this thing into my music room.

After rounding off the corners, and sanding, and sanding (!) - ending up using 0000 steel wool it was time for oiling the key cheeks.
I thought about using Danish Oil, but ended up with Liberon Finishing Oil - it's a tad better. It contains the important chinese oils, but doesn't contain linseed oil.
Applying the oil is very easy - as long as one remembers to dry off excess oil 15 mins after every appliance. I left it to dry 24 hours between each application. Sanding ever so lightly using the 0000 steel wool before applying the next layer of oil.
I repeated the process three times for this finish.
I was actually quite amazed by the result. A smooth - but very hard and resistant surface.

The cavity at the end of the shortest key cheeks are ment for holding hinges.
I want the top lid to be hinged for easy access to the Doepfer electronics.

The Fatar steel bars are a little too wide for the size of wood I have chosen.
So I decided to shorten them a little using the Dremel.


The piston rail will be fixed to the key cheeks only at the ends.
I found it necessary to stiffen the oak slab by adding an aluminum profile to it.
Also showing, the Pausch-e MIDI-scan here. The flat cable is to be split up and solderd to the piston contacts.
I used a machine wrench to mount the flat cable contacts.

The same bar from the front side.
I also mounted some green piano felt directly on the rail.

Provisions for power to the MIDI-electronics, flat cables fixed, and the Pausch-e board properly installed.
Durling assembly each manual was tested for MIDI-functionality and playability.
I do not want to think about all the work needed to take this thing apart for maintenance.
I would probably have chosen a a different approach should I ever dedice to buld one more.

I made a small shelf for the Dopefer MKE's.
Notice the three contacts at the left. They are ment for the volume/swell/crescendo pedals.

Normally you only have to set the MKE's once. But having the controls available allows me to do changes to the MIDI-settings quite easily, should I ever want to.
I also added some simple magnetic locks.


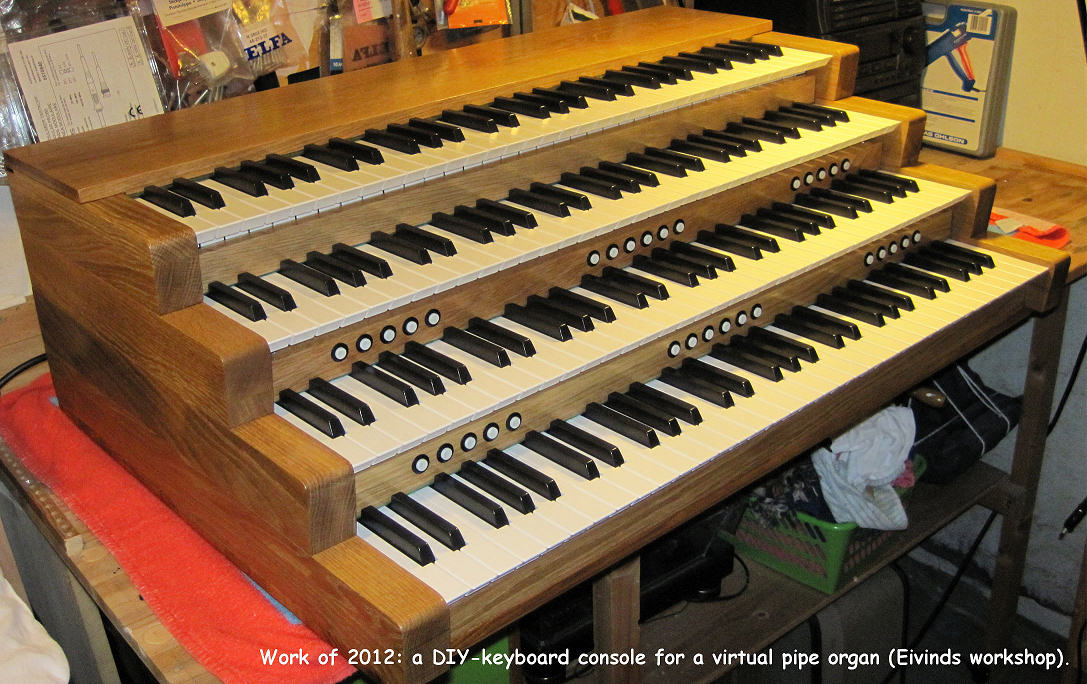
The console finished.
Next is to get some help and get it moved into my music room and hook it up to my computer.
CONTINUES NEXT PAGE - INCLUDING A SMALL PIECE OF MUSIC PLAYED USING THIS CONSOLE.
(but the next page will have to wait)
Music Gear OldGear Discography eMail About OldPictures Roland System 100 Moog Taurus Links Synth DIY-Links
The Shoplifter PAiA Theremax Theremin MIDIMINAFY Studio Electronics ATC-1
Template for controlling the Studio Electronics ATC-1 with Behringer BCR-2000